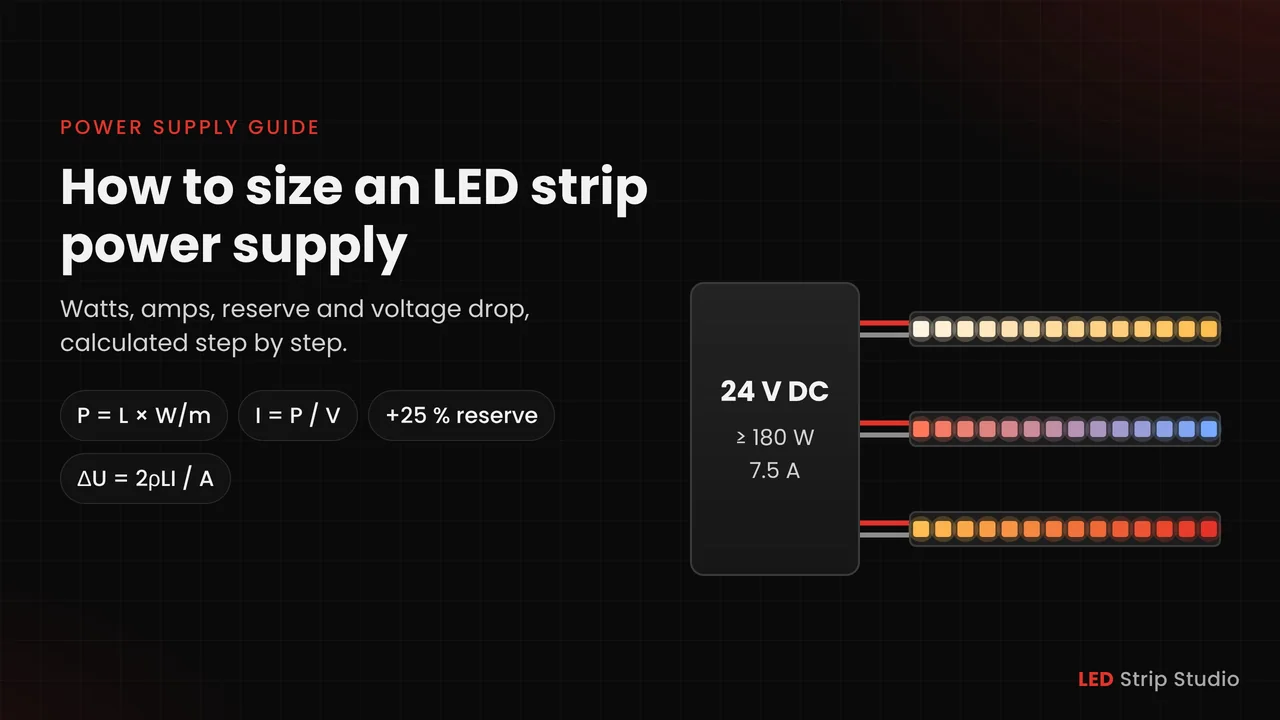
Most power problems on LED installations start on paper, not on site: a supply picked by eye runs hot, and the far end of the strip turns dim and off-color. The calculator below gives you the supply size in seconds, and the guide under it explains every number behind it.
LED Strip Power Supply Calculator
Pick the strip voltage and add every strip the supply feeds, each with its length and maximum W/m from the datasheet. The reserve starts at 25 %, the upper end of our 20–25 % recommendation, and the results update as you type. Open the cable check to size the feed cable: enter its one-way length, and both conductors are counted for you.
180 W next common supply size
7.5 A at 24 V DC
- Total LED power144 W
- LED current6 A
- Power target incl. reserve180 W
- Required supply current7.5 A
A 180 W, 24 V DC supply is a suitable starting point. Choose a model rated at least 180 W and check its temperature derating in the datasheet.
That is more than one common supply delivers. Split the installation into branches with a supply each, and run the calculator for every branch.
Cable check: voltage drop on the feed cable
Enter the distance one way; both conductors, + and GND, are counted.
- Voltage drop on the cable0.414 V
- Drop in percent1.72 %
- Voltage at the strip23.59 V
- Power lost in the cable2.48 W
- Smallest cross-section for your target1.44 mm² (use 1.5 mm²)
The drop is within your 3 % target.
This calculation assumes the feed cable carries the combined current of all listed LED strips. For separate feed cables, calculate each branch using its own current.
Copper at 20 °C, feed cable only. It leaves out the drop inside the strip and doesn't check the cable's current rating, fuses or connectors.
Several supplies? Run the calculator once per branch, as in the worked example.
Treat the results as a design aid. The calculator covers the strips only, so add the controller if it shares the supply, and check the supply’s derating in its datasheet. The cable check leaves out the drop inside the strip and sizes the cable for voltage drop only, not for its current rating. For the data side of the same project, our Art-Net universe calculator counts the universes.
Quick Answer: How Do You Size an LED Strip Power Supply?
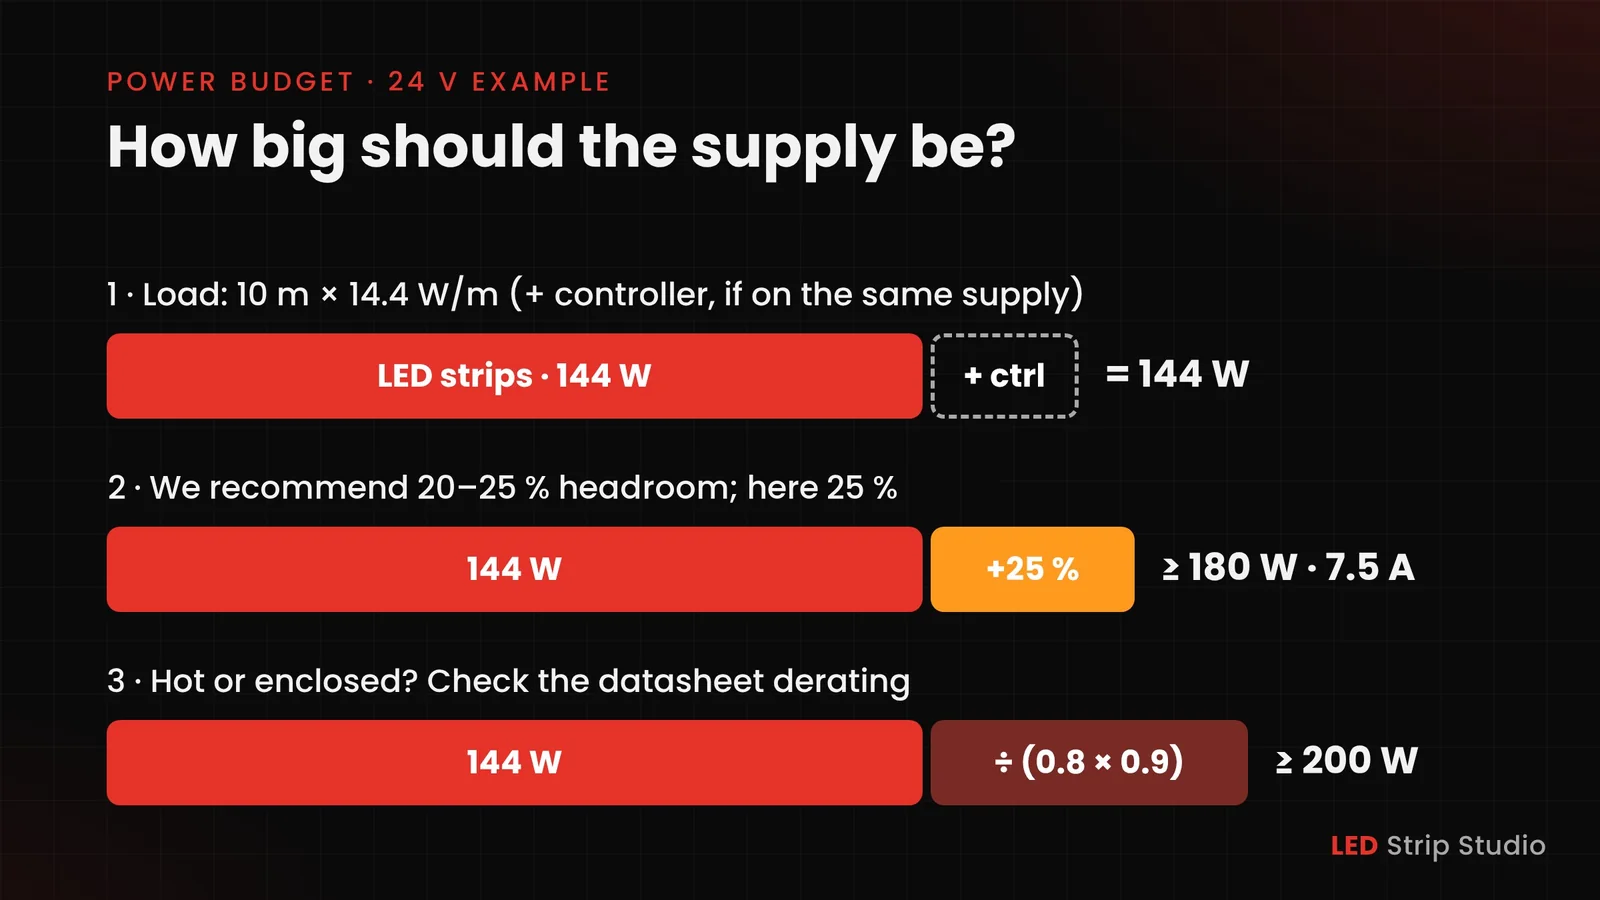
Multiply each strip’s length by its maximum W/m at full white, add the results and add the reserve: P_PSU = Σ(L × W/m) × 1.25. If the controller or other equipment shares the same power supply, include its power consumption in the total load before applying the reserve. We recommend a reserve of 20–25 %, and the examples in this guide use 25 %. Divide that by the voltage to get the current the supply must deliver. For example, 10 m of 24 V strip at 14.4 W/m draws 144 W, so it needs a constant voltage supply rated at least 180 W and 7.5 A. Then check the supply’s derating in its datasheet.
The rest of this guide walks through the math behind those numbers: what your strips really draw, how big the supply should be and when one is no longer enough, plus cable sizes, voltage drop and power injection. We wrote it for installers, technicians, lighting designers and integrators who plan whole installations, not a single strip.
One habit runs through every example: we always state the voltage, because 144 W is 6 A at 24 V but almost 29 A at 5 V.
How Do You Calculate LED Strip Power Consumption?
You start with two numbers from the datasheet: the strip voltage and its maximum consumption, usually given in watts per meter (W/m). For addressable strips, use the value for full white at maximum brightness. Chip type, LED count and pixel density are already built into that figure, so don’t add them on top.
Don’t rely on a “typical” value, because ratings vary a lot even at the same density. Even WS2815 strips with 60 LEDs per meter differ: our own 12 V WS2815 strip is rated at 8.64 W/m, or 0.72 A per meter, in its datasheet, while other makers rate theirs at up to 14 W/m.
So always take the figure for the reel you’re actually installing. On RGBW strips such as SK6812 RGBW, also check that the rating covers all four channels at full output.
How Do You Calculate Total Power for One or More Strips?
The basic formula is simple: P_LED = L × W/m. A 10 m run of 24 V strip rated at 14.4 W/m draws 10 × 14.4 = 144 W. When several strips share a supply, you add them up: P_TOTAL = (L₁ × W/m₁) + (L₂ × W/m₂) + …
A quick example: a 12 V cove has two runs, 6 m and 4 m, both rated at 14 W/m. Together they draw 6 × 14 + 4 × 14 = 140 W. With a 25 % reserve, explained below, they need a 175 W supply.
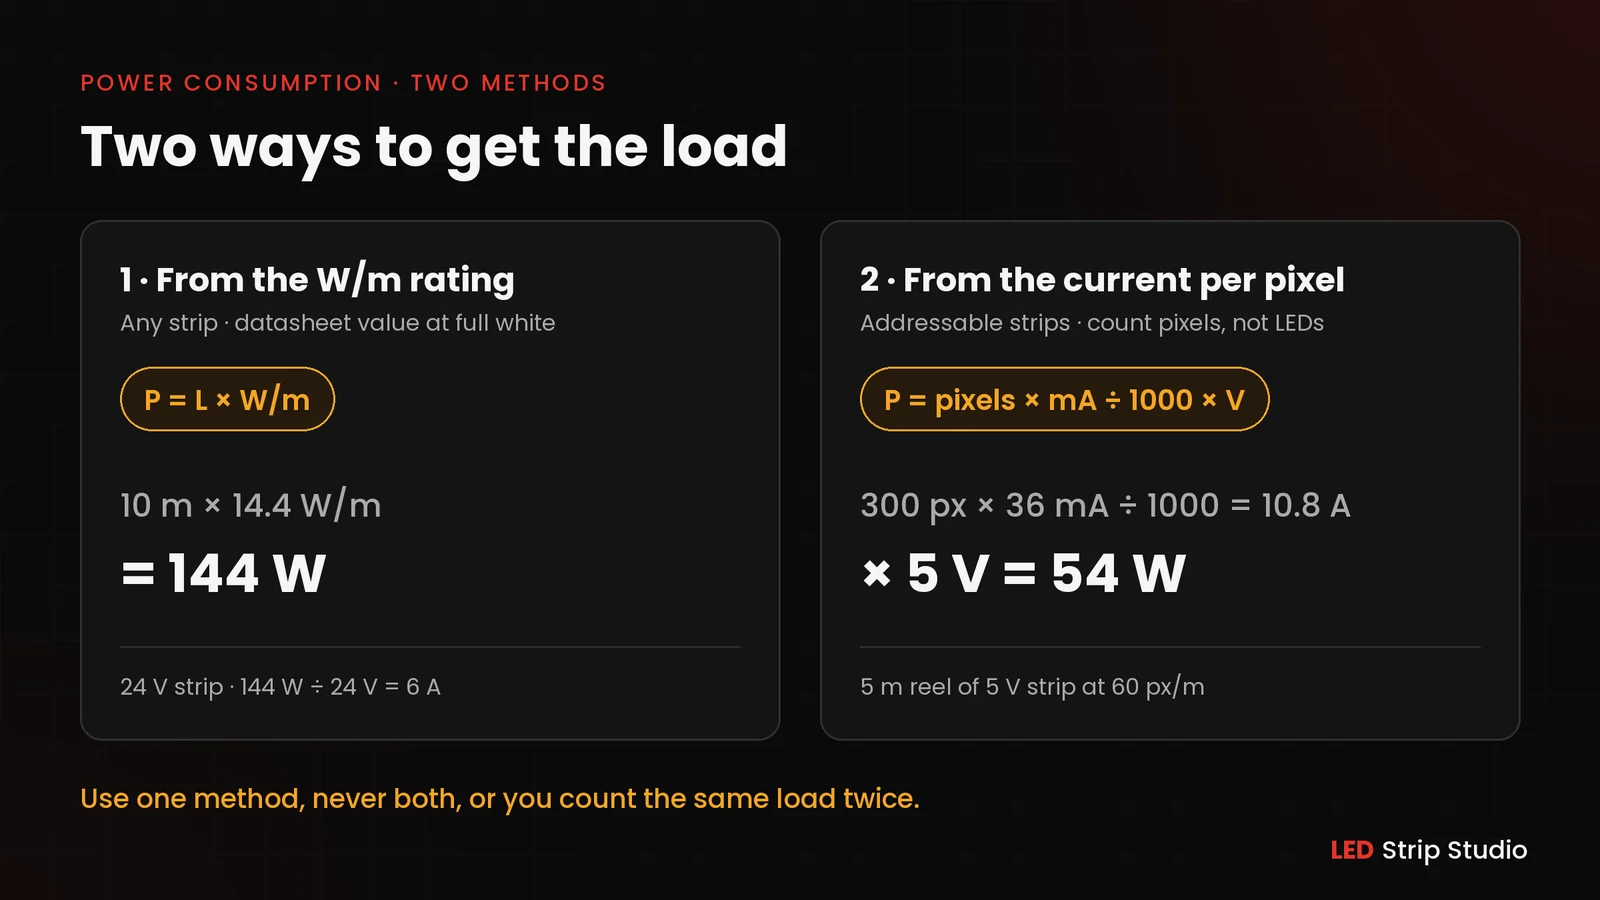
With addressable strips you can also work from the current of one pixel. Multiply the number of pixels by the maximum current per pixel in mA, divide by 1,000 and multiply by the voltage. Count pixels, not LEDs. On many 12 V and 24 V strips one IC drives several LEDs, so a strip sold as 60 LEDs per meter may have only 20 pixels per meter.
The current per pixel is where people slip, because there is no single value. Adafruit quotes up to 60 mA per NeoPixel at full white, while our hardware connection guide works with 36 mA per RGB pixel and 48 mA per RGBW pixel. Here is how much that changes the result on a 5 V strip with 60 pixels per meter:
The same 5 V strip (60 pixels per meter) calculated with two different per-pixel currents
| Example | Pixels | At 36 mA per pixel | At 60 mA per pixel |
|---|---|---|---|
| 1 m of strip | 60 | 2.16 A · 10.8 W | 3.6 A · 18 W |
| 5 m reel | 300 | 10.8 A · 54 W | 18 A · 90 W |
| Installation with 2,000 pixels | 2,000 | 72 A · 360 W | 120 A · 600 W |
For the 5 m reel, that’s the difference between a 67.5 W and a 112.5 W supply once you add the reserve. So take the value from the strip’s documentation, and if it isn’t there, ask the supplier. The last row also shows why big 5 V installations get split into branches: 72–120 A is far more than one feed cable or one strip end can carry.
Use either the per-pixel method or the W/m rating, never both, or you’ll count the same load twice.
How Do Volts, Watts and Amps Relate?
Current is power divided by voltage, I = P / V. Here’s the 144 W example at three voltages:
Current needed for the same 144 W load at different supply voltages
| Supply voltage | Power | Current (I = P / V) |
|---|---|---|
| 5 V | 144 W | 28.8 A |
| 12 V | 144 W | 12 A |
| 24 V | 144 W | 6 A |
It’s the current, not the wattage, that sizes your hardware. More amps need thicker cables, plus connectors and fuses rated for them, and they lose more voltage in the same copper. That’s why long runs are easier at 12 V or 24 V, and why 5 V strips need more feed points over the same length. Our explanation of why WS2815 runs at 12 V instead of 5 V goes deeper.
Why Calculate at Full White and Maximum Brightness?
Because sooner or later, someone will send full white. Lower brightness does reduce consumption, though not in a straight line, and content changes over the years. A gentle color scene today can become a full-white event look next season.
So size the supply for the maximum. Anything below full white then simply becomes extra headroom.
How Do You Choose the Right LED Strip Power Supply?
People often search for an “LED strip transformer”, but what a strip actually needs is a power supply that delivers stable, low-voltage DC. Choosing one comes down to three things: the right voltage, the calculated load and a sensible reserve.
The voltage has to match the strip exactly. Never mix voltages, and power each strip only with the voltage it’s rated for. Beyond that, picking a supply for a 5 V, 12 V or 24 V strip works the same way.
Constant Voltage or Constant Current: Which Do LED Strips Need?
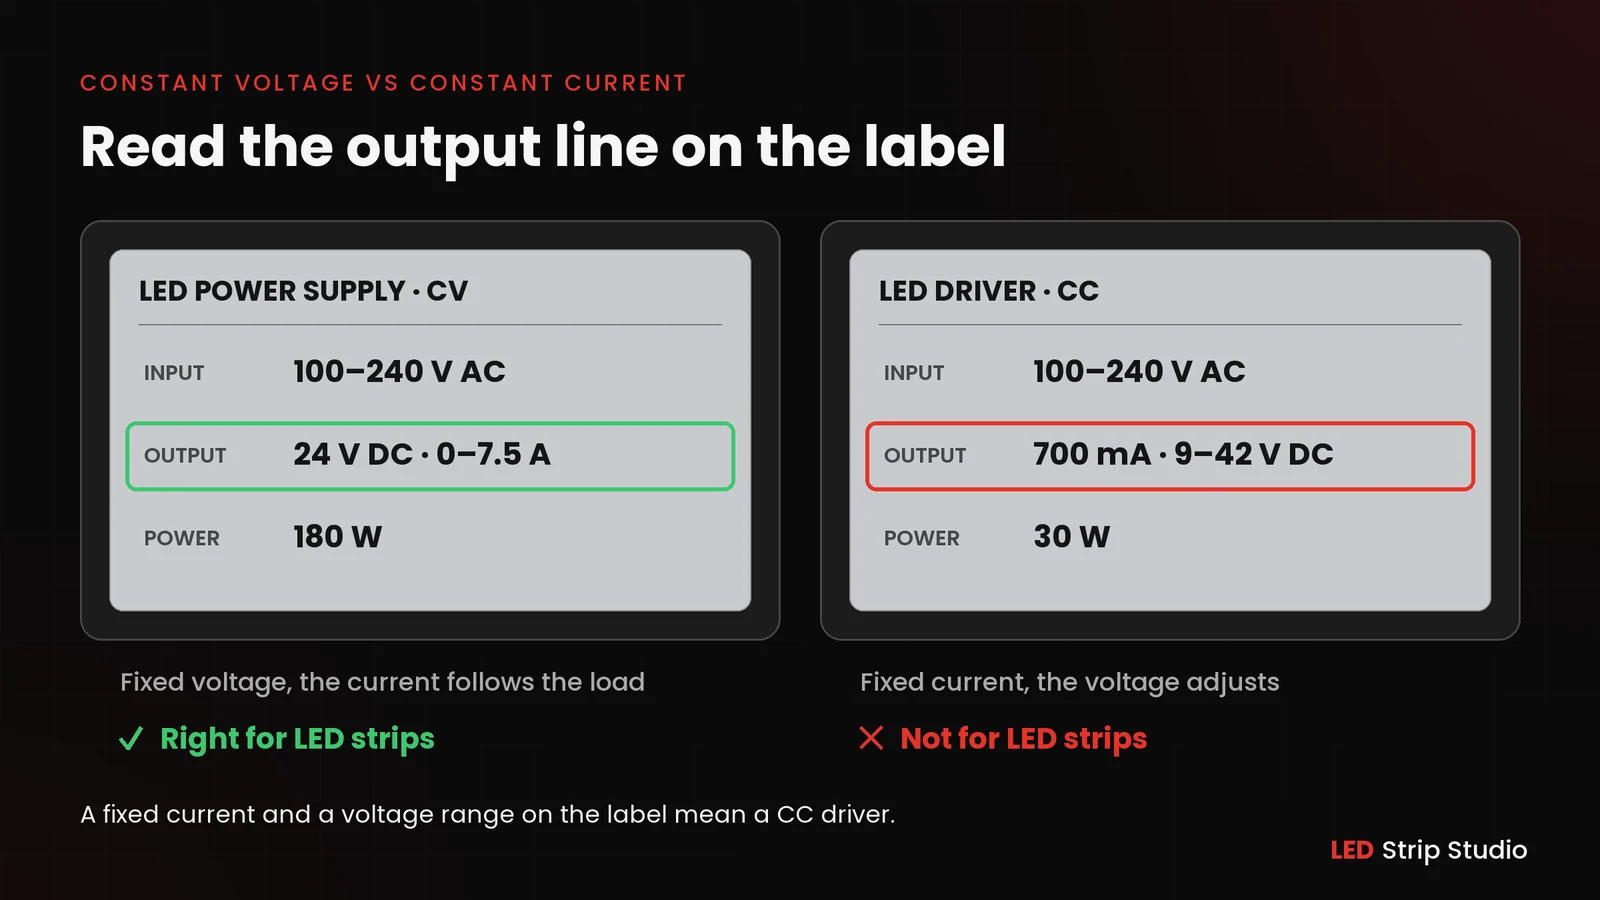
Conventional low-voltage LED strips, including the 5 V, 12 V and 24 V types covered in this guide, use constant voltage (CV) power supplies. It keeps its output at, say, 12 V or 24 V and lets the strip take whatever current it needs. A constant current (CC) driver works the other way round: it pushes a fixed current and lets the voltage adjust.
Constant voltage vs constant current LED drivers
| Parameter | Constant voltage (CV) | Constant current (CC) |
|---|---|---|
| Fixed output | Voltage, e.g. 5, 12 or 24 V | Current, stated in mA or A |
| Varies with load | Current | Voltage, within a stated range |
| Typical use | LED strips and CV modules | LED modules and lights designed for a fixed current |
| Datasheet shows | One output voltage and maximum current | One output current and a voltage range |
| Right for LED strips? | Yes | No |
Quick datasheet test: if it gives a fixed output current and a voltage range, it’s a CC driver, and it doesn’t belong on a strip.
How Much Reserve Should an LED Strip Power Supply Have?
We recommend adding 20–25 % headroom to the calculated load, and the examples in this guide use the upper end: P_PSU = P_LOAD × 1.25. That’s our own recommendation, not a standard, and other guides use different numbers. Whatever figure you choose, leave some headroom. A missing reserve is the mistake we see most often.
For the 144 W example that’s 144 × 1.25 = 180 W. You’ll also hear about the “80 % rule”, which gives the same result: 144 / 0.8 = 180 W. At 24 V, that supply has to deliver at least 7.5 A.
Always check the datasheet, the ambient temperature and the derating as well. Many supplies give less power when it’s hot or when they sit in a closed box. The Mean Well RSP-200 datasheet, for example, allows full load up to about 45 °C ambient and only half load at 70 °C. If yours allows only 90 % under your conditions, the same 144 W load needs 144 / (0.8 × 0.9) = 200 W of rated power.
Can an LED Strip Power Supply Be Too Big?
Not for the strip. A regulated constant voltage supply only delivers the current the load draws, so a 400 W supply with the right voltage runs a 100 W strip happily. You pay for it in price, size and space.
The catch is a fault: a big supply can push far more current into a short circuit than a thin cable or a small connector can take. Give every branch its own fuse, rated above its normal operating current but never above what the cable can carry, and have the final choice checked by a qualified person against local regulations.
Which Supply Parameters Matter Besides Watts and Volts?
Whether a supply survives years in a ceiling comes down to the rest of its datasheet:
- IP rating that suits the location, with extra protection outdoors where it’s needed.
- Short-circuit protection, so a wiring fault switches the output off instead of killing the supply.
- Over-temperature protection for supplies in closed ceilings and cabinets.
- A derating curve, which tells you how much power is left at higher temperatures.
- Efficiency, because every lost watt turns into heat right next to the supply.
- A reputable brand with full documentation; we use established makers such as Mean Well.
Decide where each supply goes before you buy it. It needs room to get rid of heat, and someone will need to reach it one day.
When Do You Need More Than One LED Strip Power Supply?
One supply is fine as long as all strips run at the same voltage and the total load plus reserve fits its rating. The strips also have to be close enough for short feed cables. Break any of those conditions and it’s time to split.
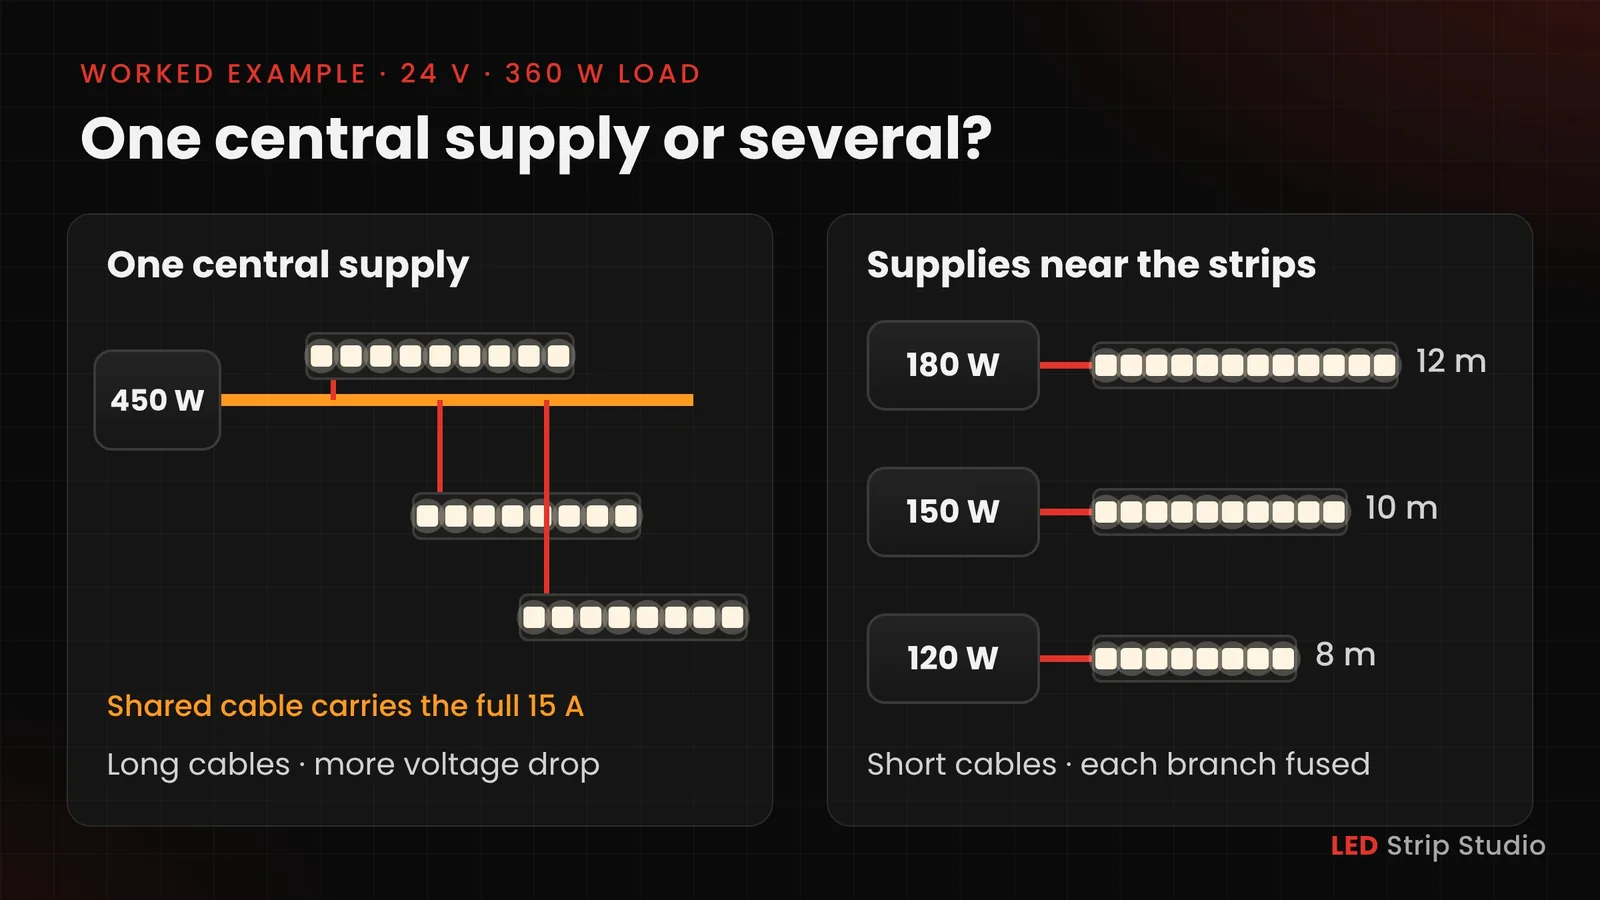
In practice, distance usually forces the decision before wattage does. Strips spread across a large space mean long feed cables, and long cables mean voltage drop. Several smaller supplies placed near the strips solve that, ideally spread as evenly as the layout allows. Our LED tree case study from Kigali shows it at scale: 106 supplies, each placed next to the tubes it feeds, up to six of them.
How Do You Split Power Into Separate Branches?
A branch is simply everything one supply feeds. When you split an installation, these rules keep it safe:
- Split by physical location and feed points, not just by wattage.
- Size each supply for its own branch:
P_PSU,i = P_BRANCH,i × 1.25. - Give every branch its own properly sized cable and its own fuse.
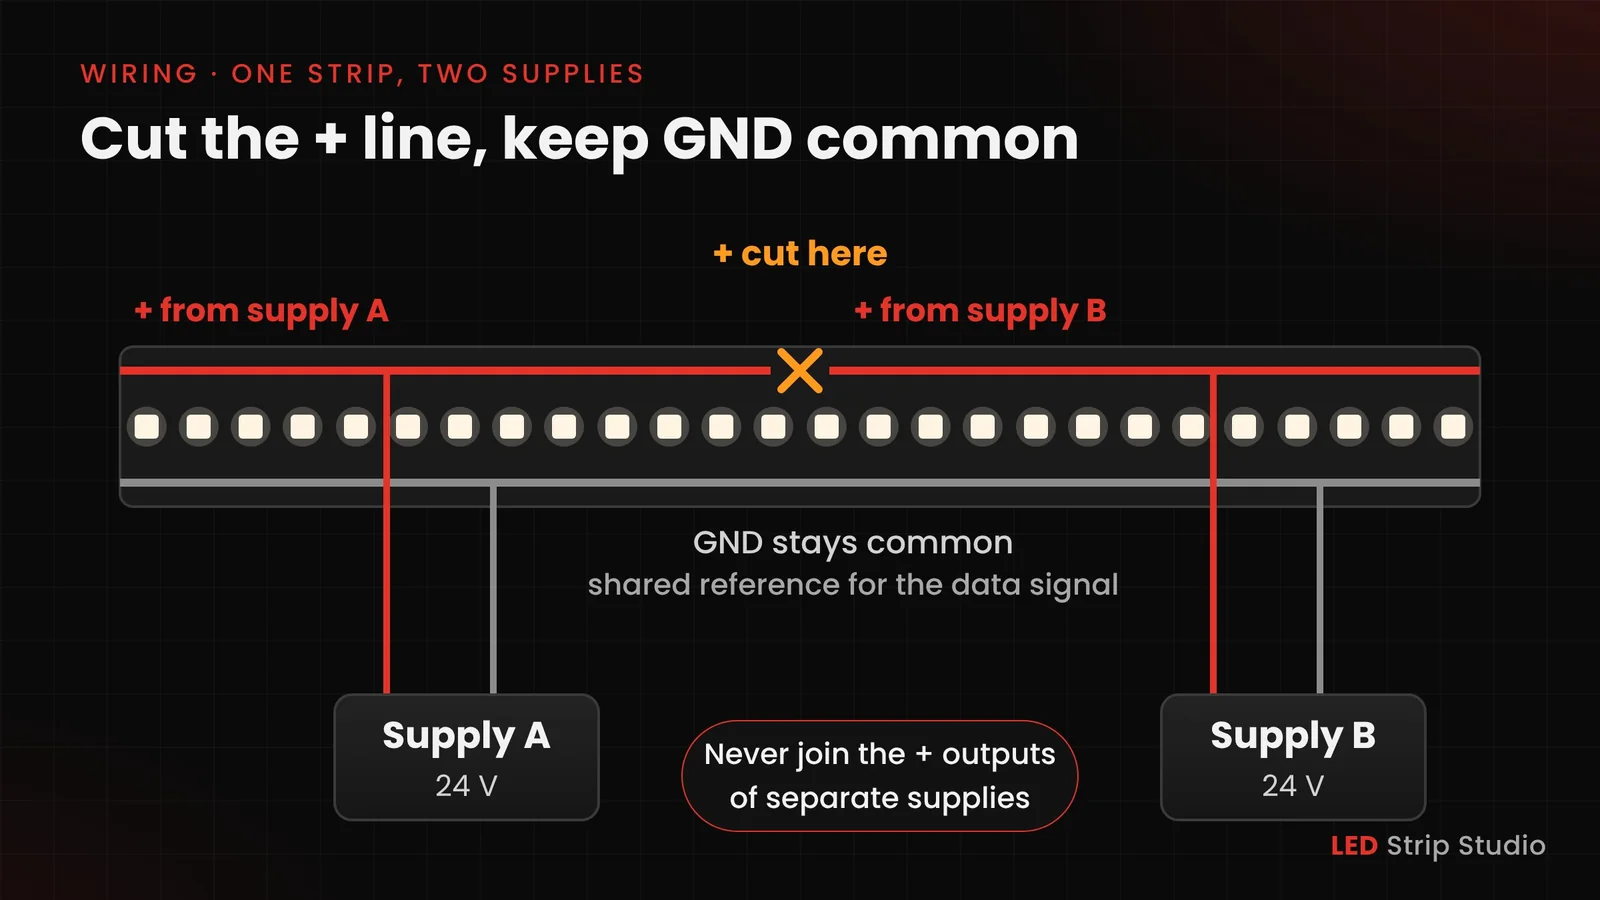
- Never connect the + outputs of separate supplies in parallel, unless the manufacturer explicitly allows it.
- On addressable strips, keep GND common so the data signal has a shared reference.
When two supplies feed one continuous strip, cut the + line where their sections meet, so the supplies never feed each other, and leave GND connected. The worked example below sizes three branches this way.
How Does the Controller Affect the Power Plan?
If the controller runs from the same supply as the strips, add its own consumption: P_LOAD = P_LED + P_CONTROLLER + P_OTHER. If it has a separate supply, leave it out, or you’ll count it twice.
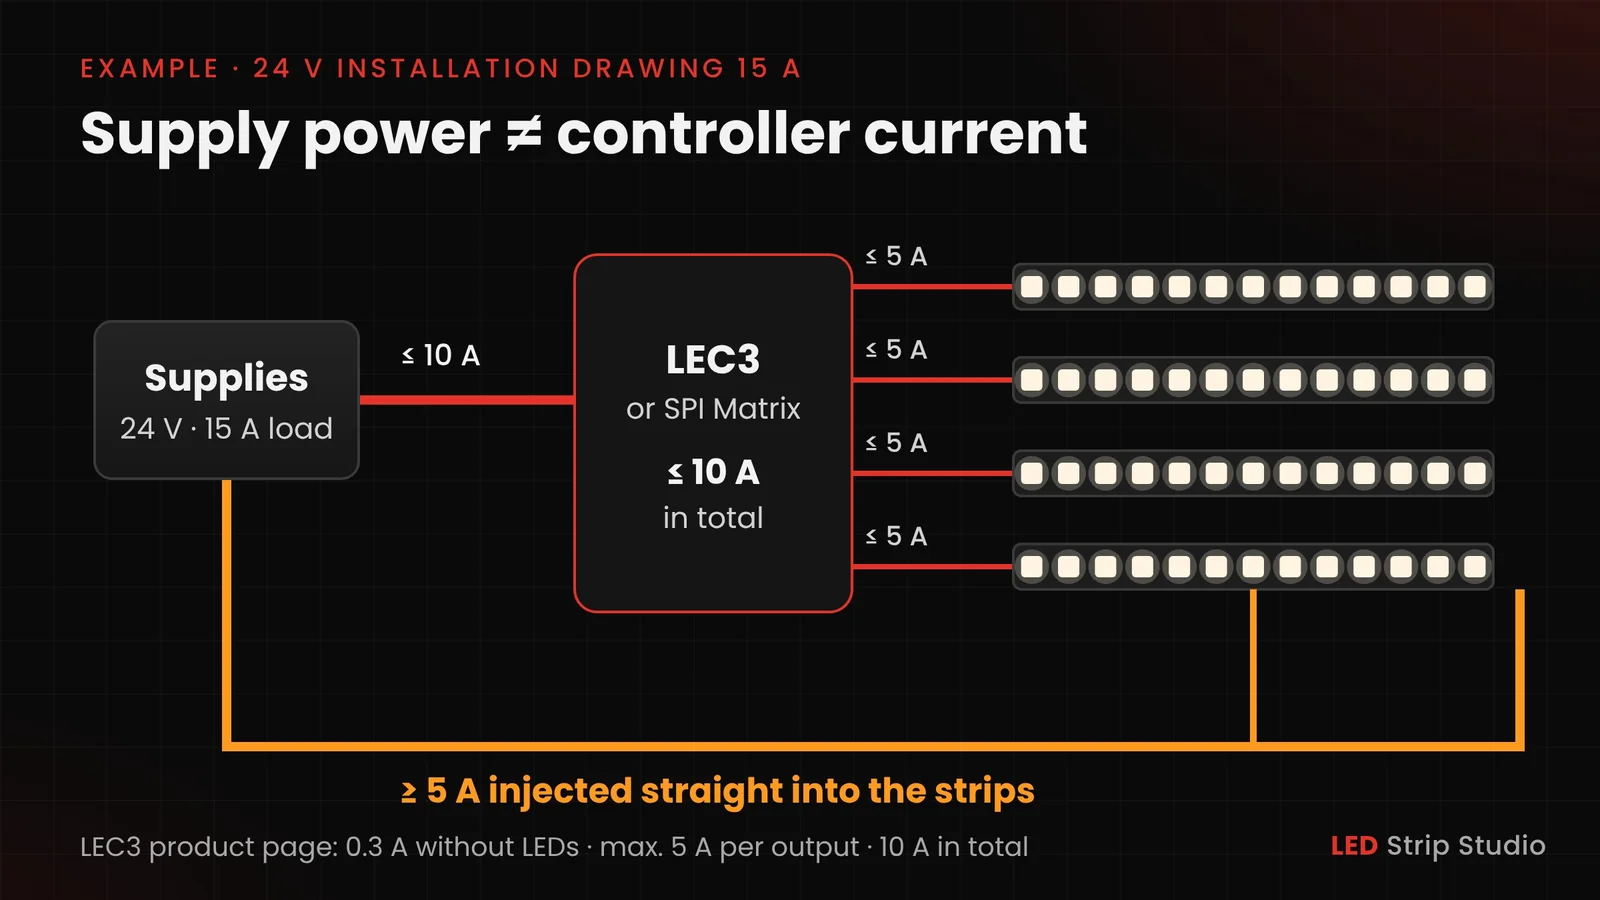
That’s only half the story, though. You also need to know how much current the controller can pass on to the strips, per output and in total. A supply big enough for the whole installation doesn’t mean all of its power may flow through the controller.
Take LEC3 as an example. Its technical specification lists 1.5 W for the controller itself without LEDs and 10 A in total, and its hardware manual allows 5 A per output, protected by a resettable polyfuse. SPI Matrix lists the same limits. A 24 V installation drawing 15 A therefore needs at least 5 A fed into the strips directly from the supplies, not through the controller.
The same applies to a DMX decoder for LED strips. Data leads have their own distance limits, covered in our guide to sending an SPI signal over long distance.
How Do You Prevent LED Strip Voltage Drop?
Voltage drop is the voltage lost in cables and in the strip’s own copper because of their resistance. You see it as falling brightness and a color shift towards the far end. It’s often yellowish, but depending on the LEDs some strips drift towards red or another tint. Low-voltage systems suffer most: 0.5 V is 10 % of 5 V, but only about 2 % of 24 V.
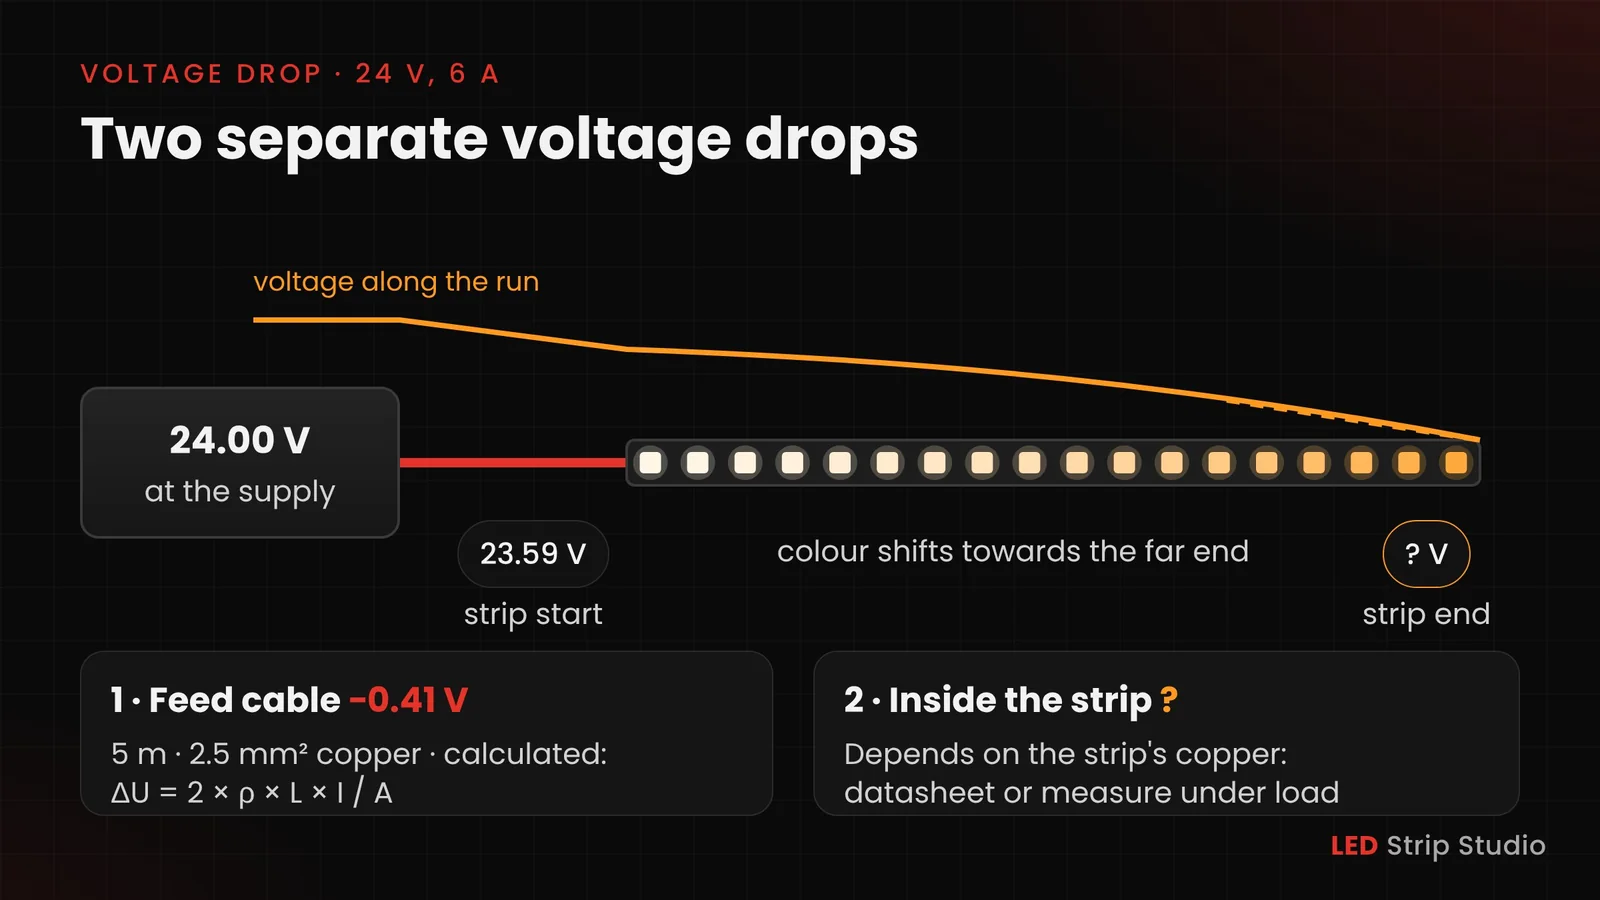
There are two separate drops. The one on the feed cable can be calculated from its length, cross-section and current. The one inside the strip depends on its copper traces and on how the load is spread along it, so it comes from the manufacturer or from a measurement.
How Do Cable Length and Cross-Section Affect Voltage Drop?
A feed cable has two conductors, + and GND, and current flows through both. That’s why the formula has a 2 in it: ΔU = (2 × ρ × L × I) / A. L is the one-way length in meters, I the current and A the cross-section in mm². For copper at 20 °C, ρ = 0.01724 Ω·mm²/m.
Say a 24 V strip draws 6 A through a 5 m copper cable of 2.5 mm². The drop is 2 × 0.01724 × 5 × 6 / 2.5 = 0.414 V, about 1.72 % of 24 V, so roughly 23.59 V reaches the strip. The cable also turns 6 × 0.414 = 2.48 W into heat. If you measure both conductors together, don’t multiply by 2 again.
To get the minimum cross-section, decide how much drop you’ll accept and turn the formula round: A_MIN = (2 × ρ × L × I) / ΔU_MAX. With a 0.5 V limit in the same example you get 2.07 mm², so you’d use 2.5 mm². That only covers voltage drop; the cable must also meet its current rating, installation method and local regulations.
And use copper. Aluminum and copper-clad aluminum (CCA) have higher resistance, so the same cross-section loses more voltage.
When Is Power Injection Needed?
Power injection means feeding power into the strip at extra points, not only at its start. You need it when the strip gradually dims or changes color towards the end, and in borderline cases where the far end only just gets enough voltage.
Don’t plan injection by a fixed rule such as “every 3 m”. The drop inside a strip depends on how it’s built, so base the plan on the manufacturer’s data or on measurements of the strip you’re using. Our WS2815 guide shows the baseline we start from on 12 V runs.
How Do You Find and Check the Right Injection Points?
If the manufacturer gives a maximum length per feed point, divide the strip length by it and round up. If it gives a maximum current per feed point, divide the strip current by that instead. No data? Then measure:
- Set the whole strip to full white at maximum brightness.
- Look for the point where it starts to dim or shift color.
- Measure the voltage between + and GND at the supply terminals, at the start of the strip and at that point.
- Compare the readings: a gap between supply and strip start is the cable, a gap along the strip is the strip itself.
- Add a feed point before the spot where the drop shows, then measure again.
Always measure under load. With no load almost no current flows, and your meter will show the full voltage even on a cable that’s far too thin.
How Do You Size an LED Strip Power Supply Step by Step?
This is the order we work in. Each step uses the result of the one before.
- Note the voltage and maximum W/m of every strip type from its datasheet.
- Measure the total length of every strip run on the drawing.
- Work out the power of each run,
P = L × W/m, at full white and maximum brightness. - Group the runs into branches by location, and add the controller where it shares a supply.
- Size each branch supply with about 25 % headroom and check its datasheet derating.
- Calculate each branch current,
I = P / V, and check controllers, connectors and fuses against it. - Size each feed cable for the drop you accept, then check its current rating.
- Plan the feed points from the strip data and verify them by measuring under load.
Do all of this before you order material. And choose proven strips from a reliable maker, because the whole calculation rests on their W/m figure.
Here’s a worked example with illustrative values, not a real project. A 24 V installation has three runs of a strip rated at 12 W/m: 12 m, 10 m and 8 m long. Each run gets its own supply close by.
Worked example: sizing three 24 V supplies by branch (illustrative values)
| Supply | Run | Load | Reserve | Min. rating | Min. current at 24 V |
|---|---|---|---|---|---|
| PSU 1 | 12 m × 12 W/m | 144 W | 25 % | 180 W | 7.5 A |
| PSU 2 | 10 m × 12 W/m | 120 W | 25 % | 150 W | 6.25 A |
| PSU 3 | 8 m × 12 W/m | 96 W | 25 % | 120 W | 5 A |
| Total | 30 m | 360 W | – | 450 W | 18.75 A |
So the three supplies come out at 180, 150 and 120 W. One central 450 W supply would cover the same load, but its shared cable would have to carry the full 15 A out to the far runs.
Which LED Strip Power Supply Mistakes Cost the Most?
- No reserve. A supply at 100 % of its rating has nothing left for tolerances, heat or next year’s extension.
- Sizing for typical content. The first full-white scene then overloads the supply.
- Guessing the current per pixel. 36 mA and 60 mA lead to very different supplies, so take the value from the datasheet.
- Long, thin cables from a far-away supply. The voltage is already low at the start of the strip, and the end changes color.
- High current over long runs. At the same power, a 5 V strip needs 4.8 times the current of a 24 V strip.
- Pushing everything through the controller. Check its current per output and in total, not just the supply wattage.
- Joining the + outputs of separate supplies. Cut the + line between sections fed from different supplies and keep GND common.
Planning a larger LED installation and want a second pair of eyes on the power plan? Book a free consultation with our team.
Frequently Asked Questions
What size power supply do I need for my LED strip?
Multiply the strip length by its maximum W/m, add any controller on the same supply, then add headroom; we recommend 20–25 %. A 10 m, 24 V strip at 14.4 W/m draws 144 W, so it needs a supply rated at least 180 W and 7.5 A.
Is the 80 % rule necessary for LED power supplies?
It's a rule of thumb that gives the same result as 25 % headroom, the upper end of our 20–25 % recommendation. The datasheet has the final word, including derating for temperature and mounting.
What happens if an LED strip power supply is undersized?
It runs at or above its limit, gets hot and ages faster. Depending on its protection, it cuts the output, restarts over and over or lets the voltage sag, which you see as flicker or dimming.
Can I use a 24 V power supply on a 12 V LED strip?
No. Power each strip only with the voltage it's rated for, and never mix voltages on one supply.
What is the difference between an LED driver, a transformer and a power supply?
A power supply turns the input voltage into the voltage and current a device needs. A constant voltage LED driver is a supply with a regulated fixed voltage, such as 12 V or 24 V, and that's what LED strips need. A constant current driver regulates current for LED modules built for it, while a transformer only changes AC voltage and doesn't give a strip stable DC by itself.
Can I connect multiple LED strips to one power supply?
Yes, if they share the same voltage and their total load with reserve fits the supply. Keep them close to it and give each strip its own feed cable, so the current of all strips doesn't flow through the first one.
How far can the power supply be from the LED strip?
As far as the voltage drop allows for your current and cable. For example, 6 A over 5 m of 2.5 mm² copper loses about 0.41 V at 24 V; the calculator above does this for your own values.
Why is the end of my LED strip dimmer or yellow?
Almost always voltage drop: the far end gets less voltage than the start. Yellow is common, but some strips shift towards red or another tint. Check the feed cable's size and length, then add power injection where measurements under load show the drop.
Summary
Total power is the length times the maximum W/m of the exact strip at full white; use datasheet values, not typical ones, including the current per pixel. Use a constant voltage supply at the strip's exact voltage with headroom; we recommend 20–25 %, and the datasheet derating has the final word. The same wattage at 5 V means 4.8 times the current of 24 V, and current decides cables, fuses and feed points. A bigger supply doesn't hurt the strip, but every branch needs its own fuse, and the controller has its own current limits. Split large installations into branches, never join their + outputs, keep GND common and check feed points under load.
Sources & references
- LED Strip Studio — expert notes from our technical team, November 2026 (power reserve, supply protections, power distribution, injection procedure, common mistakes)
- LED Strip Studio — technical foundation of the LED power supply calculator (P = L × W/m, I = P / V, reserve and derating, ΔU = 2ρLI / A, A_MIN, cable loss)
- LED Strip Studio — LEC3 technical specification (PDF): 5–24 V / 1.5 W without LEDs, 10 A maximum current; LEC3 hardware manual (PDF): 5 A per output, resettable polyfuse; SPI Matrix product page: same limits
- LED Strip Studio — LSS12V digital RGB LED strip 60LPM IP67 datasheet (PDF): WS2815, 12 V, 0.72 A and 8.64 W per meter
- LED Strip Studio — Hardware Connections: 36 mA per RGB pixel, 48 mA per RGBW pixel
- LED Strip Studio — WS2815 60 px/m strip ratings in our articles: 8.64 W/m (PSL2 wiring) and 10.8–14 W/m (What Is WS2815?)
- Adafruit — NeoPixel Überguide: up to 60 mA per pixel at full white
- WLED project documentation — fusing principle (fuse above operating current, not above the wire rating)
- Mean Well — RSP-200 series datasheet (PDF): RSP-200-12 rated 16.7 A, RSP-200-24 8.4 A; derating curve (full load to about 45 °C, 50 % at 70 °C); short-circuit, overload, over-voltage and over-temperature protection; efficiency up to 90 %
- IEC 60028 — International standard of resistance for copper (annealed copper 1/58 Ω·mm²/m ≈ 0.01724 Ω·mm²/m at 20 °C)
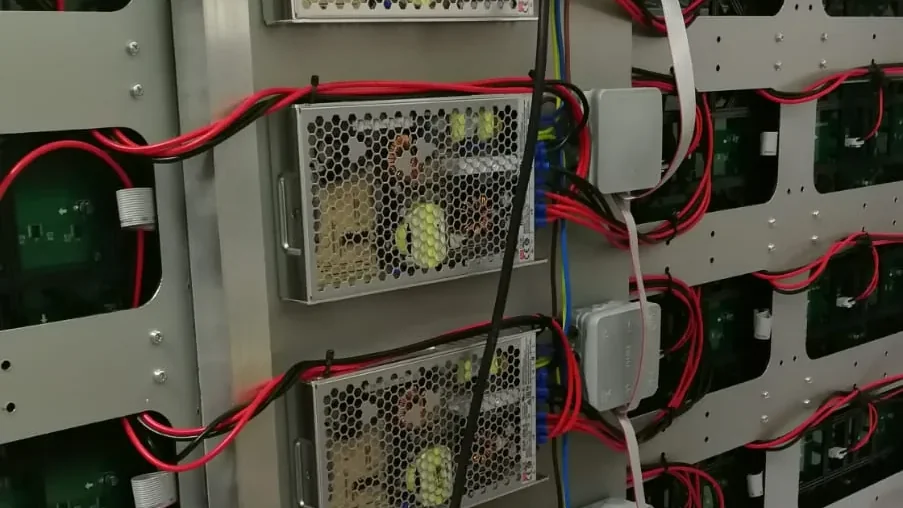
- LED Strip Studio — project photo: power supplies behind the LED horizon of the CNN Prima NEWS studio
- LED Strip Studio — What Is WS2815? 12 V Addressable LED Strip Explained