A one-page reference for the first power-up of the Powered SPI LED Controller 2 (PSL2). For the full walkthrough with photos and the unboxing video, read PSL2 setup from unboxing to first light.
Checklist before power-up
- Read the voltage on the label on top of the case.
- Use a strip with exactly that voltage.
- Keep the strip within the output power of the variant, or feed it from an external supply.
- Wire the strip and insert the micro SD card while the mains cable is unplugged.
- Plug the IEC cable into a grounded outlet.
- Note the firmware version on the start screen.
- Run a test pattern before you set up any control mode.
Voltage variants
| Variant | Strip voltage | Max. output current | Max. output power |
|---|---|---|---|
| PSL2 5 V | 5 V | 10 A | 50 W |
| PSL2 12 V | 12 V | 5 A | 60 W |
| PSL2 24 V | 24 V | 2.5 A | 60 W |
All variants take 86–264 V AC at 47–63 Hz. The controller itself draws about 5 W. The signal side handles up to 1,024 RGB or 768 RGBW pixels on every variant; see how many pixels PSL2 can control.
Connector panel
| Connector | Type | Notes |
|---|---|---|
| Power input | IEC C14 | Mains cable, 86–264 V AC |
| DMX IN / DMX OUT | 3-pin XLR, male / female | OUT passes DMX through or sends DMX generated by PSL2 (blue DMX GEN LED) |
| SD card | Micro SD, push-push | FAT32, up to 32 GB |
| Trigger | 4-pin | Two inputs for buttons, switches or sensors |
| WPS/Reset | Recessed button | Press with a paper clip |
| Ethernet | RJ45, 10/100 Mbps | Wi-Fi switches off while a wired link is active |
| LED output | 4-pole screw terminal | GND, Clock, Data, + power |
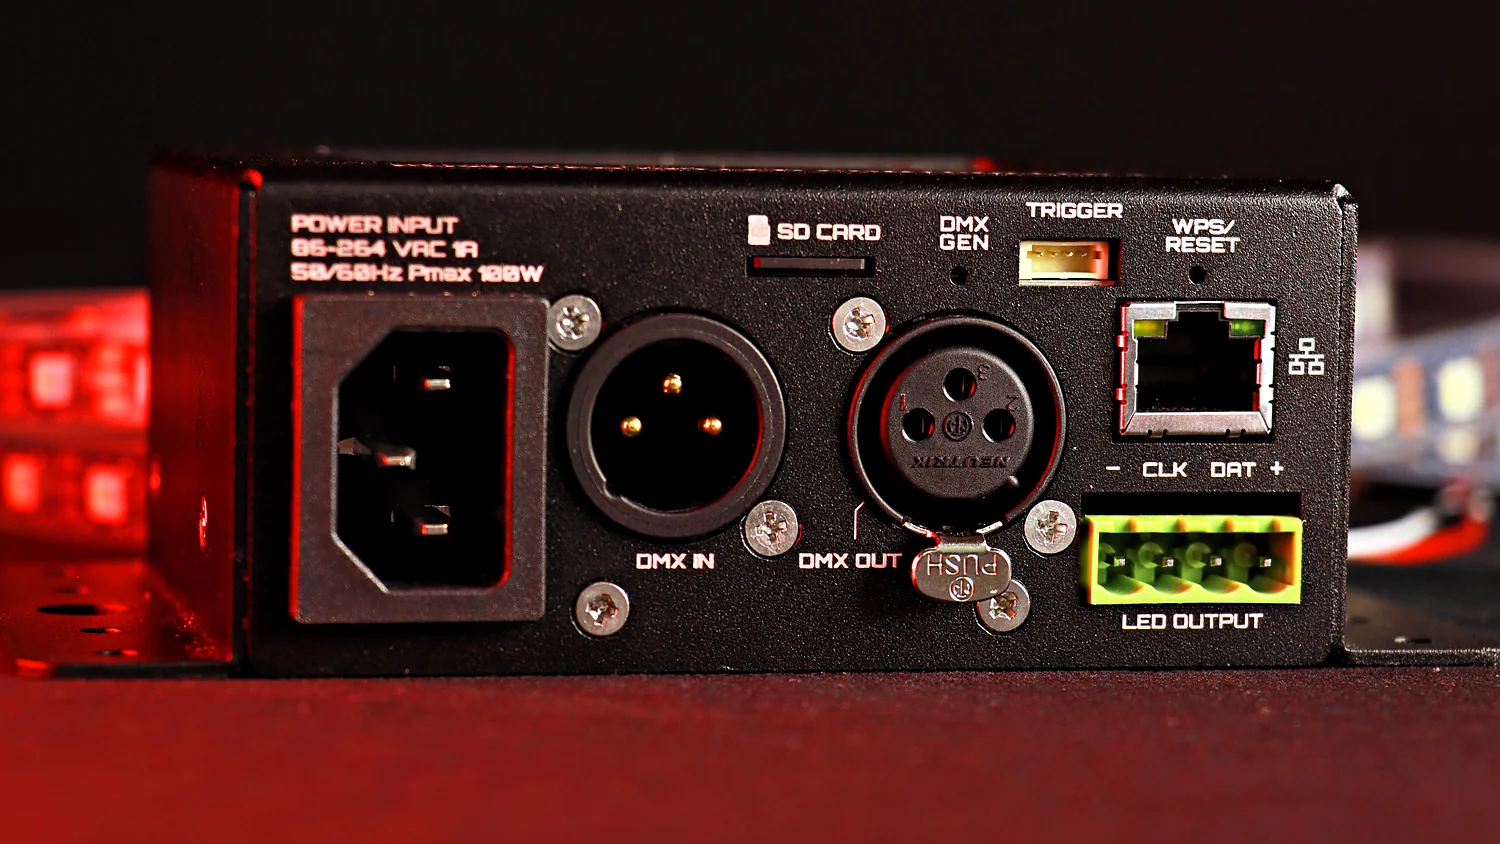
WPS/Reset button
| Press | Result |
|---|---|
| Short press | Starts WPS pairing |
| 3–10 seconds | Clears the Wi-Fi credentials |
| Over 10 seconds | Resets all settings to factory defaults |
Display and menu
- Buttons: Up, Down, Back and Enter; on-screen arrows show what each one does.
- Status bar: network, SD card, DMX input and data output. An extra icon means unsaved settings.
- Saving: confirm the save prompt when you leave the menu, or the change is lost.
- Timeout: the menu closes after 60 seconds without a button press.
Test pattern and quick fixes
Open Menu → Test and pick a pattern. Test sends data for the maximum pixel count of the selected IC type and overrides every other control mode, so stop it when you are done.
| What you see | What to check |
|---|---|
| Strip stays dark | IC type in Menu → Output → IC; strip voltage; wiring of Data and GND |
| Random flicker | IC type; length of the data cable to the first pixel |
| Wrong colours, e.g. red shows as green | Colour order in Menu → Output → Col.Order |
| Setting did not stick | It was not saved when leaving the menu |
The supported LED chips page lists the IC types PSL2 can drive.
Mounting limits
- Indoors only: IP30, −10 °C to 45 °C, away from direct sunlight, heat and liquids.
- Leave the middle of the case uncovered: the Wi-Fi antenna sits there, so no metal or cables over it while Wi-Fi is on.
- Fix it through the side tabs with screws, cable ties, clamps or a safety wire.
Next steps
- Set the animation PSL2 starts with: default file and AutoPlay.
- Control it from a console: working with DMX on PSL2.
- Compare all ways to run it: PSL2 control options.